Showing posts with label cookbooks. Show all posts

Sunday, October 21, 2012

Kids in the Kitchen: Chicken Noodle Soup

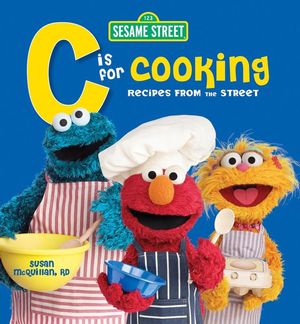
J and I made another recipe from his Sesame Street cookbook this Friday.  Well, really we made something loosely based on the recipe - it doesn't seem that close now that I look at it!

He chose Big Bird's ABC Chicken Noodle Soup:
 According to the recipe, there wasn't really many steps the he could do (only measuring pasta) so J did that.  But he also counted out carrots, handed me a partially peeled onion, poured the chicken broth from the can into the pot... and asked a zillion times if it was ready yet! :o)
 Of course, I can never find alphabet pasta when I want it, so we made do with tiny stars instead.  J loved it.  So did C (mostly throwing pasta around).  It was pretty tasty for the 'big kids' (me and N) too. Guess we'll be having "Chicken and Stars" regularly this winter.  (And I need to buy alphabet pasta in bulk next time I spot it!)
Chicken and Stars Noodle Soup

3 carrots, peeled and chopped
2 sticks celery, chopped (approximate - I just used a large handful from the freezer!)
1 onion, sliced
1 large chicken breast (I chopped it into 4-5 pieces to help it cook faster)
1 can (14.5 oz) chicken broth
5 c water
1 bay leaf
1/2 - 1 tsp salt (depending on saltiness of broth)
1/2 tsp dried thyme
1 c uncooked little noodles

Combine vegetables with chicken, broth, water, herbs and salt in a large saucepan.  Heat to a boil over medium-high heat.  Reduce heat to low and simmer until chicken is cooked (approx. 30 mins).  Remove chicken and chop or shred into very small pieces while returning the soup to a gentle boil.  Add noodles and cook until noodles and vegetables are tender (approx. 7 mins).  Add chopped chicken back to soup and simmer 1 minute to heat through.  Serves 4-6.

J Tip*: To cool chicken and stars quickly, place spoonfuls on your placemat and pick out the bits.  Drink the broth last, straight from the bowl!

*Only partially endorsed by Mum.

Tuesday, October 9, 2012

Kids in the Kitchen: Hot Chocolate Floats

Hopefully this is the start of a regular post on cooking with J (and C, eventually).

When we were at our WIC appointment last week, J spotted a Cookie Monster on a book in the nutritionist's office and she said, "Oh, do you like helping in the kitchen?  I have one last English copy if you want it."
"Yes, please!" said J's face, and with profuse thanks we left with J hugging his new most prized possession to his chest.
Source: www.wiley.com
So now we have an exciting new activity to keep us occupied: browsing through C is for Cooking and making the recipes one by one.  (This is not fast enough for J!)

He even couldn't wait to follow a recipe and wanted a smiley face tortilla for lunch (peanut butter with raisin eyes and nose, jam mouth, and cheese hair and beard).
The first recipe that caught his eye was for hot chocolate floats, essentially hot chocolate poured over a scoop of icecream.  (Quite an ingenious way to make sure the hot chocolate isn't too hot, if you ask me!)
The book has little icons which indicate appropriate steps for kids to help with (which is good for Mum not taking over) and each one has a a description or fun facts from a Sesame Street character to add motivation to the fabulous photos.
So J stirred the cocoa and sugar together, then stirred when the milk was added.  Mum heated the milk, added the chocolate chips and stirred some more.  J helped scoop icecream into each mug.  Mum poured the hot chocolate over the icecream.  J called Dad for his "hot chokit" and then we all sipped our yummy drinks (while C napped).

Ingredients to serve 4:
2T cocoa powder
1/4 c sugar
3 c milk
1 oz chocolate, chopped (or 6-8 chocolate chips)
4 scoops (vanilla) icecream (1 per mug)

The hot chocolate was fine on its own, without the icecream.  I'd leave out the chocolate next time - too hard to incorporate, just sat at the bottom!

Wednesday, September 12, 2012

From my Kitchen...

We ran out of pancake syrup the other day.  I just hadn't got around to getting it, so when I spied a simple recipe in one of my Destitute Gourmet cookbooks, it was sure to be made!  3 ingredients later we have a yummy syrup for less than I can buy it, and it tastes better.  Not to mention, no high fructose corn syrup or other additives in sight.

I didn't have the usual vanilla essence in the cupboard because I've got some heavenly pure vanilla essence from Mexico that we bought on our San Antonio trip.  (Along with the vanilla flavour, there is a delicate aftertaste reminiscent of coconut, despite the only ingredients being alcohol and vanilla beans!  It gives a slightly tropical hit to the syrup.  Mmm.)

Homemade Pancake Syrup

Simmer 1 cup of brown sugar with 1/2 cup of water until the sugar dissolves and stir in 1 teaspoon of vanilla essence.  Simple, eh?  I think you could probably fake maple syrup if you substituted maple flavouring - just like a bought one!

At the moment, my syrup is masquerading in the fridge as molasses because I haven't relabelled the jar. I hope it lasts longer that way. :o)

Alongside pancakes, I've enjoyed a swirl of this syrup in our homemade yoghurt.  (My 'go to' yoghurt flavour is honey and a dash of cinnamon.)

We've had our EasiYo maker in North America for the longest time, but I can't afford the packet mixes here (and I'd have to get them sent from California).  So this option is out.

I don't have a candy thermometer so it makes heating milk to the right temperature a little hard, but I've experimented successfully with adding an active plain yoghurt to warmed milk and then putting that in the EasiYo, but the results were variable and the process messy.

Then I found this recipe to make yoghurt in a slow cooker.  Perfect!  I set the timer and I don't have to worry about getting the right temperature, and it makes a 1/2 gallon (2L)!  I skim a bit of the whey off the top before I scoop it into containers (so it is thicker), and it's done.

Sunday, January 11, 2009

Sopaipillas & Posole

Our visit to the US over Christmas had some pleasant foodie sidetracks. As well as savouring homemade hamburgers for dinner on Christmas Day at April's mom's place in Denver, we had the pleasure of staying with April's friends, Eric and Gentry, in Laramie, WY.
Here we are from left to right: Jada (3), Gentry... holding Eric... holding Macy (under 1), me, April, and Nathan.
They treated us to a special American meal, usually tasted in New Mexico (where Eric grew up). First on the menu was posole, a stew made with pork, green chillies, and hominy (corn kernels soaked in lye).

It was hot and delicious! (Sorry, the photo of Chef Eric was too blurry to keep.)

Gentry was trying to make sopaipillas (soap-a-pee-yas) for the first time and enlisted my help as a baker. We used this recipe, which is much like a scone dough. The dough is rolled out to a few millimetres thickness,
cut into pieces (squares and triangles are common too)
and then deep fried for a few seconds each side until golden brown.

The sopaipillas puff up in the hot oil and develop a crispy crust.
Next you split a side open and squeeze in some runny honey.
Gentry and I felt very decadent as we supped on sopaipillas and posole that night. The sopaipillas certainly help temper the heat of the posole, and they taste great when washed down with Eric's Belgian home-brewed beer!
I have since discovered recipes for both posole and sopaipillas (called Navajo Fry Bread) in a Christmas present I recieved from April's mom; "I Hear America Cooking: The cooks and recipes of American regional cuisine" by Betty Fussell. (Betty is a cousin of April's grandmother, and was featured in the August 2008 edition of Vogue.)

Wednesday, October 29, 2008

Bron and the Bearded Bagel Baker

Once upon a Saturday, Bron and her bearded beloved decided to bake bagels for the first time.
The library lent them "Bread: from sourdough to Rye" by Linda Collister. The bagel recipe looked promising (though they didn't recognise any of the recipes supposedly from Australia and NZ in the last chapter!)
They mixed the dough, let it rise, punched it down, then formed it into a dozen springy balls. Next they poked their fingers through each ball, spun it around on their fingers, and made a bagel-ly, doughnut shape. Then they remembered to take pictures for posterity!
After another rest, the dough was plunged into a pot of boiling water and Bron and her bagel baker took turns to deftly flip each bagel with a scoop.


Each doughy tourniquet was brushed with egg white, and some were sprinkled with sesame seeds.


And baked in the oven to golden brown perfection.
It was hard to wait for them to cool down.
Beautiful bready aromas filled the kitchen as Bron and the bearded one waited... and waited...
... and finally gave in...

... smothering their beauties with homemade strawberry jam! MMMMMM!

The Bakery

Ever since the food course, we have been much more conscious of what we are putting in our mouths, and what food we are buying. More about that in another post - suffice to say that we are now using organic flour whenever possible.
The flour is important because it is the most basic ingredient in bread-making. Our place has begun to resemble a bakery over the last few months as we've hardly bought bread from the supermarket since July.
It started when we returned to Canada in July, and I was home while Nathan did Hebrew at summer school and I got ready for teaching school. Long periods in an empty basement suite were filled with yeasting, waiting, mixing, kneading, waiting, rising, waiting, baking, and waiting while cooling. I tried my hand at a sourdough starter with rye flour and water. It was a bit of a hit and miss affair. I made a VERY dense loaf at one stage (pictured below) and threw a large amount of starter into the compost! The last lot migrated to the compost when I cleaned the fridge earlier this month. It was 'well fermented', shall we say? No recipe for you, as it was probably one of my least successful baking endeavours ever.
I reverted to my trusty basic bread recipe from our awesome Aussie friend, Susannah. Once you've made the plain white loaf a few times you can easily judge if the dough needs more flour or water by touch. If you double the recipe, it makes one large loaf, or two smallish ones.
Susannah's Basic Bread
2 cups of flour
1 cup warm water
1 teaspoon of dried yeast
1 teaspoon (or less) of salt [sometimes I put in vegemite/marmite instead of salt]
1 teaspoon of sugar/honey etc
1 tablespoon of oil.

Activate yeast by putting it in warm water with the sugar. When it is frothy, mix it with the dry ingredients and oil. Knead. Allow to sit in warm place, covered with loose cling film. After about and hour, knead again then form into desired shape. Place in cooking pan and allow to rise in a warm place for about 30 mins. Bake in a moderate oven for 20-40 minutes.
I also found success making cinnamon rolls - the Vancouver specialty. Here they are before... and after baking, but without their crown of cream cheese frosting.
Nathan tried his hand at making bread over the recent reading week, and has been bitten by a yeasty bug too... making bread every 4 or 5 days ever since. He experimented with whole wheat flour and decided that a mix of white and whole wheat was more pleasant than the dense rolls he first started with. Next he's going to try using spelt flour.
So, now that we've perfected this recipe, Nath suggested we try making bagels (one of the few bread products we have bought recently). A visit to the library was duly made, and we spent a fun Saturday morning making a dozen bagels to a recipe in "Bread: from sourdough to rye" by Linda Collister (adapted to include more marmite, of course!) My next post will be a photo-journal of our fun.

Sunday, August 10, 2008

Food Course: Final Day

Our final day on the food course was a flurry of activity as we prepared to leave, packing and cleaning and scurrying to take final notes from books we wouldn't be able to access easily as we went our separate ways. We had a brief class time where Emily had an opportunity to share about her choice to be a vegetarian, and Loren shared some thoughts and quotes about the communion meal.

The highlight of the day was the outdoor banquet of left-overs from the week, which we began with a simple and informal communion meal. It was a joyful revisit of our previous meals and an opportunity to thank Loren and Mary Ruth with some gifts (a cut-paper picture with an uncanny familial resemblance, 
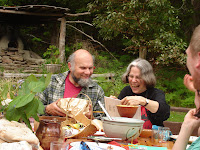
and a wood-turned arbutus bowl), and Sarah for her TA work (chocolates). We were all blessed to receive a copy of our very own 'Galiano Cookbook', a collection of recipes used on the course. Then, with tummies full of pie and plenty for our minds to mull over, we packed ourselves off to the ferry and our various homes.
Loren and Mary Ruth celebrated their hard work (and our departure) with a meal at their local French restaurant, and were pleasantly surprised to discover we had all chipped in to pay for their meal!

Sunday, September 2, 2007

Bible (Edmonds Version)

Being a New Zealander, living on a student budget in Vancouver, Canada, has a tendency to lead one to nostalgia for familiar food. Not that Canadian food is that much different overall, but the influences of Quebec and U.S.A. are obvious to me! Croissants in a can, anyone?!

The first item to enter the suitcase on the big move over was not my Holy Bible (shock! horror!... a theological grad student without a Bible?) because I knew I'd be able to find plenty of those when I got here (and after 8 months we have 5 versions). It was, in fact, my Edmonds Cookery Book - the NZ cooking bible. This wise decision was verified not long after we arrived when, within a week of meeting them, two different Kiwis over here exclaimed, "You have your Edmonds! Can I borrow it?"

This lead me to thinking... I wonder if it is online in any form? and Can you order it from Amazon, etc.? A quick search reveals an even better gem than my 1999 edition - the 3rd edition from 1914 - facsimiled and typed out at an online archive here. I haven't tried anything from it yet, but it reveals the change in NZ culinary history when compared to my copy.

My edition has been put to use tonight. I made the short pastry for a bacon and egg pie that isn't really a pie. It doesn't have a pastry lid so it's more of a quiche. Then again, the eggs aren't beaten with milk, just cracked over the onions and bacon and topped with grated cheese. We've come to the conclusion that it could be a 'piche'. It isn't that glamorous to look at so there isn't a picture, but N did have seconds so it can't be bad.